Tuesday, June 5, 2012
Glammies with Glasses, Here are some helpful tips!
Glammies,
I came across this article that listed some very helpful tips for all the Glam Dolls out there that wear glasses. If you'd like to know more...read below!
1.) Stay In Neutral Territory: According to Brown, less is definitely more. "Wearing glasses draws plenty of attention to your eyes, so it’s best to keep your eye makeup simple. Stick to neutral shades on the eyes but remember to blend a darker color into your crease for added definition. Save the bright, bold colors for your lips. Of course, don’t forget corrector and concealer—a must for all women, but especially if you’re wearing glasses."
2.) Don’t Be Afraid of Mascara: "Most of the time I suggest applying 2-3 coats of mascara to really make eyes stand out. Always use black mascara, it makes the biggest difference. (Unless as per the below your prescription makes your eyes look bigger)."
3.) Get In Line: "Adjusting the thickness of your liner is important when you’re wearing glasses," says Brown. "If your frames are thicker, you’ll want to apply a thicker line to the upper lash line so that eyes stand out. If your frames are thinner, a softer liner works."
4.) Take Your Glasses Look From Day To Night: "There are several ways," she says. "First, you can add bold colors to your cheeks and lips. A bright or dark lip color can instantly transform you into ‘party ready’ and a bright shade of pink blush on your cheek will instantly give your face a lift and flush of color. Or, you can add sparkle to your eyes. Use a lighter shimmer or sparkly color on your lower lid. To create a smoky eye for glasses, double line your eye. It instantly makes your eyes stand out without being too much. Just line your eye with a gel or pencil, then take a similar colored powdered eye shadow and using a liner brush, line above the previous line, smudging as you go."
5.) Define Your Brows: "Brows make a huge difference when you wear glasses— the frames draw attention to them. Learning how to shape and color your brows can change the entire frame of your face."
6.) Pay Attention To Your Prescription: "If your prescription makes your eyes look smaller, be sure to line your eyes all the way around. I recommend using a liner that is darker than your natural eye color, since it creates a perfect contrast that defines the eyes. Finish with two to three coats of black mascara on the top lashes only for a refreshed look. If your prescription makes your eyes look bigger, use a light hand when applying your eye makeup and be sure to blend everything carefully. The last thing you want your glasses to do is magnify any mistakes. For shadows, go with light, neutral shades like my Gold Nugget Sparkle eyeshadow. Your eyeliner should be delicate and thin, with only one coat of mascara to open up the eyes."
Tips above were taken from this article: http://www.refinery29.com/makeup-for-girls-who-wear-glasses/slideshow?page=1#slide-1
XO,
Aisha
Monday, May 14, 2012
Hot Nails for Summer!
Glam Dolls,
Check out these hot nails for Summer! I just fell in with this look and had to share it with all of you...

Before you start, make sure you have everything you need and that it's easy to reach from wherever you're sitting. It's also a good idea to make a quick trip to the bathroom. There's nothing worse than creating an awesome mani and then ruining it because you didn't plan ahead!
What you'll need:

Two color polishes and a topcoat. You can choose colors that compliment or go bold and pick two that clash. Experiment with different combinations and see what works.

A sponge, a plastic sheet and toothpicks. I bought a big bathroom sponge and I just cut sections off when I need them. The sections don't have to be perfectly cut, as long as one side is flat it will work. You can use absolutely any sponge - a makeup sponge, washing up sponge or any other kind of sponge you can find.
If you don't have any of these plastic wallets in the house, raid the kitchen cupboards for some foil or baking paper.
The Fun Part!

Step 1: Using the lightest of the two colors, paint your nails and wait for it to dry completely.

Step 2: On a flat surface, paint a generous amount of the colors right next to each other on to the plastic. Make sure they're just about touching at the edges.

Step 3: Using a toothpick, swirl the two colors together in where they meet. The area where they mix will determine the length of the graduation. So if you want a long graduation, mix a bigger section of the colors, if you want less of a fade, just mix them together a tiny bit.

Step 4: Take your sponge and dab it directly down on to the polish a few times.

Step 5: Dab the sponge directly down on to your nail. Keep dabbing lightly and moving it very slightly up and down your nail.

(You can repeat this step as many times as you need to. Just make sure each layer is completely dry before sponging again otherwise you will start smudging the bottom layers and ruin the whole thing.)

Step 6: Add a topcoat. Or two or three! The sponging makes this mani very bumpy so you may need a couple of topcoats just to even out the surface.

Step 7: Clean up all the excess using a brush dipped in acetone or polish remover. I use a Q-tip dipped in remover for the big bits I can reach on my skin, then a small brush in pure acetone as I get closer to my nail and to make a crisp line near the cuticles.

All finished!
Obtained from: http://www.glamour.com/beauty/blogs/girls-in-the-beauty-department/2012/05/gradient-nails-picture-tutoria.html
XO,
Aisha
Check out these hot nails for Summer! I just fell in with this look and had to share it with all of you...
Before you start, make sure you have everything you need and that it's easy to reach from wherever you're sitting. It's also a good idea to make a quick trip to the bathroom. There's nothing worse than creating an awesome mani and then ruining it because you didn't plan ahead!
What you'll need:
Two color polishes and a topcoat. You can choose colors that compliment or go bold and pick two that clash. Experiment with different combinations and see what works.
A sponge, a plastic sheet and toothpicks. I bought a big bathroom sponge and I just cut sections off when I need them. The sections don't have to be perfectly cut, as long as one side is flat it will work. You can use absolutely any sponge - a makeup sponge, washing up sponge or any other kind of sponge you can find.
If you don't have any of these plastic wallets in the house, raid the kitchen cupboards for some foil or baking paper.
The Fun Part!
Step 1: Using the lightest of the two colors, paint your nails and wait for it to dry completely.
Step 2: On a flat surface, paint a generous amount of the colors right next to each other on to the plastic. Make sure they're just about touching at the edges.
Step 3: Using a toothpick, swirl the two colors together in where they meet. The area where they mix will determine the length of the graduation. So if you want a long graduation, mix a bigger section of the colors, if you want less of a fade, just mix them together a tiny bit.
Step 4: Take your sponge and dab it directly down on to the polish a few times.
Step 5: Dab the sponge directly down on to your nail. Keep dabbing lightly and moving it very slightly up and down your nail.
(You can repeat this step as many times as you need to. Just make sure each layer is completely dry before sponging again otherwise you will start smudging the bottom layers and ruin the whole thing.)
Step 6: Add a topcoat. Or two or three! The sponging makes this mani very bumpy so you may need a couple of topcoats just to even out the surface.
Step 7: Clean up all the excess using a brush dipped in acetone or polish remover. I use a Q-tip dipped in remover for the big bits I can reach on my skin, then a small brush in pure acetone as I get closer to my nail and to make a crisp line near the cuticles.
All finished!
Obtained from: http://www.glamour.com/beauty/blogs/girls-in-the-beauty-department/2012/05/gradient-nails-picture-tutoria.html
XO,
Aisha
How to: Winged-Out Eyeliner
Hey Glammies!
I came across an article on Glamour.com that listed tips on how to acheive the perfect winged eye! I thought this would be great to share.
Tip 1: Use a light eye pencil to create a sketch of how your "wings" will look. This way, you can easily make corrections by erasing with a Q-Tip. The line should start as thin as possible and grow fatter and fatter toward the outer corner of your eye (you'll trace over it with liquid liner later, and many liquid liners are shaped like calligraphy pens, which'll help you nail the perfect thickness). How far your wings go is up to you (it depends on your eye shape, face shape, personality), but keep in mind that a few centimeters go a long way, and less is usually more.
Tip 2: Step away from the mirror for a couple minutes, then come back. You should be able to tell right away if your eyeliner looks symmetrical on both sides. If it doesn't, erase and adjust. If you really have trouble getting the angles of your wings to match up, trace a business card--that's a trick Gwen Stefani's makeup artist, Kathy Jeung, told me once, and somehow it really does help!
Tip 3: Trace over the pencil with liquid liner, resting your elbow on a table to help keep your hand steady.
Obtained from: http://www.glamour.com/beauty/blogs/girls-in-the-beauty-department/2009/04/getting-wingedout-eyeliner-to.html
So Glam Dolls what do you think? I would love to hear your thoughts! Do you have any advice to add?
XO,
Aisha :)
Sunday, May 13, 2012
Spring/Summer 2012 Lip Colors
Stay happy, Stay safe, Stay glam!
XO,
Aisha
$10 Dupe for the Urban Decay Naked Palettes & A Super Brown Smokey Eye Tutorial
XO,
Aisha
Tuesday, April 24, 2012
Affordable Make-Up Brushes and Tools
Hi my beautiful Glammies!!
The vid posted above is about super affordable tools and products that I use in my daily routine. I hope this helps!! Talk to you soon glam dolls...
Xo
Aisha
Sunday, April 15, 2012
Flirty Spring/Summer Look
Here's a vid for you Glam Dolls! It's a Fun Flirty look that you can rock this spring or summer! Let me know what you think!
xo
Aisha
Friday, April 13, 2012
Massive Drug Store Haul
Hey Glam Dolls!!
I have posted my first video!! Let me know what you think...
Xoxo,
Aisha
Tuesday, March 13, 2012
Inexpensive Dupe for the Beauty Blender Sponge
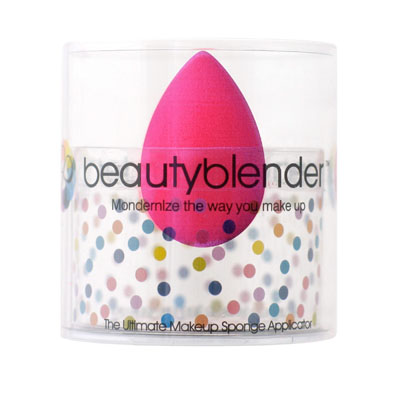

Hi Glam Dolls,
I am super excited to share a great dupe with you all. Walgreens and Walmart sells a great inexpensive dupe for The beauty blender sponge. The beauty blender normally sells from $18.99-$20.00.
I purchased the Soho London beauty sponge from Walgreen's for $4.99 (Thanks to the sale!). Walgreen's is currently offering $3 off off the Soho beauty sponge which is normally, $7.99. Even if you paid full price for the sponge, you are still getting one heck of a deal.
I am in loooovvvveeee with the Soho sponge and I am glad that I have a great new tool to add to my make-up collection and the best part is that I saved myself a good chunk of money! I am a sucker for a good deal :)
So my beautiful Glammies, have any of you tried the Soho beauty sponge? If so what do you think??
Stay glam my friends <3,
Aisha oxo


Thursday, March 8, 2012
A Quick Hello!
Hi Glamour Dolls!
I am very excited to start my new blog... I am a real woman...mother of 2, wife, I have a full-time job, and I go to school full time as well. I am feeling the affects of the economy, just like everyone else. I found it hard to connect with some of the beauty guru's out there because really, there isn't money in my budget to support a Mac or Urban Decay habit(I am not downing the brands or any other beauty guru out there!!) I am just being honest. On this blog you will find that all of my shopping and finds are things you can find in the drug store, Target, Walmart or affordable products online. Really all I want to is create an outlet for myself where I can talk about my favorite thing....Make-Up!
Let's share with one another the things we love and have discovered to help us look glam without spending a ton!!
Thank you for coming on this journey with me...let's have some fun!!
<3 Aisha
Subscribe to:
Comments (Atom)